Wednesday, February 25, 2009

Peppers & Pasta for Presto Pasta Nights

There must be hundreds of ways to prepare pasta and sauces.. at least! So when I read that Theresa from The Food Hunter was hosting Presto Pasta Nights this week, I was ecstatic with the thought of reading all the foodies entries to get even more idea's to add to my recipe box. Today I happened to read Theresa's recipe for the most glorious preparation with a Pork Ragu. Her ingredients are so delicious and I know they must make a very complex and flavorful pasta dish.

We cook with lots of peppers. Peppers and sausage, scaloppini, salads, ratatouille, stuffed peppers, peppers and eggs and peppers and pasta. Even my finicky daughter loves when I roast the peppers to add to a dish. Last night was one of those nights that I needed a presto pasta dish and with peppers, basil and garlic on hand we had a quick and tasty meal. This dish is my entry into this weeks Presto Pasta Nights.


This dish is really easy to prepare. I sliced all my peppers and cooked them in a large pan in olive oil till soft and golden brown. I added kosher salt, freshly ground black pepper, red pepper flakes, a few dashes of hot pepper sauce (no vinegar added), whole peeled garlic cloves and tons of freshly sliced basil. I sauteed till garlic was soft and slightly golden and basil was wilted. I then transfered the pepper mix onto a cutting board and chopped. Added the pepper mix to the cooked pasta and tossed. I added around 1/2 of a cup of the hot water from the pasta pot. *Do not add fresh water. I only add the water from the boiled pasta because it adds flavor and richness from the starch. Presto..simple no? :)

Serve with crusty bread, a salad and your favorite house wine!
Buon Appetito,
Laurie

Monday, February 23, 2009

Pecan Turtles

I mentioned in my Amaretto Chocolate Walnut Biscotti post the decadence of Guittard chocolates, they truly are luxurious and so smooth and buttery. I wanted to use a good quality chocolate for these Pecan Turtles and this happened to be on the shelf at a local market. I hadn't seen it there before and I'm sure they only stocked it especially for Valentines Day, but this company has made me a customer for now on.

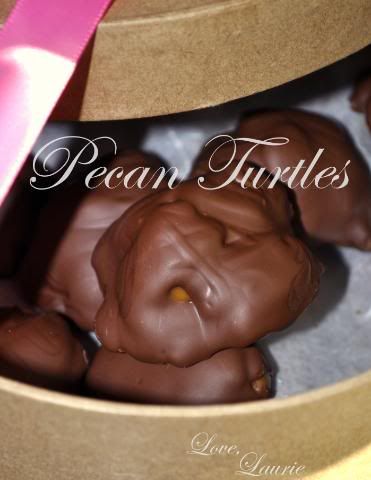
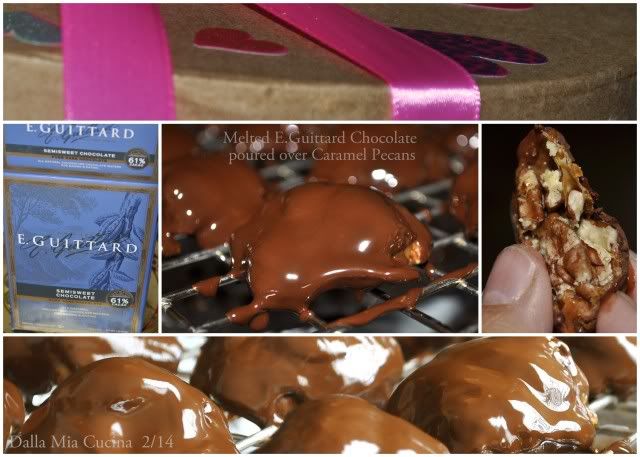
I first saw this simple recipe on an Emeril Lagasse show. He places around five pecans down on silpat and then drizzles the caramel over the pecans. I didn't feel the pecans had enough chewy caramel and next time I will mix the pecans in the caramel and then place five or so in a cluster and let cool completely before pouring the chocolate over them. When I do prepare the turtles again, I will also mix small quantities of pecans in the caramel at a time so the caramel doesn't harden while the pecans are still in the bowl. I think leaving the bowl over hot water will keep the caramel liquid enough to work with. I'm hoping! :)

My husband "loved" his homemade turtles and I will definitely make them the year round just for him... and maybe me too!

Ciao and Buon Appetito!
Laurie


Emeril Lagasse's
Chocolate Covered Pecan Turtles


Ingredients
4 tablespoons butter, cut up, plus more for pans
3/4 pound pecan halves (about 3 1/2 cups), toasted
1 cup evaporated milk
1 cup light corn syrup
1 cup sugar
1 teaspoon vanilla
1/2 pound semisweet chocolate, chopped
1 tablespoon vegetable shortening (recommended: Crisco)

Directions
Generously butter 2 baking sheets.

On the baking sheets, arrange the pecan halves in snowflake-shaped clusters of 5 pecans each, overlapping the nuts in the center, leaving 2 inches of space between each.

In a medium saucepan, combine 1/2 cup of the evaporated milk, the corn syrup, and sugar and bring to a boil. Add the remaining 1/2 cup evaporated milk and the 4 tablespoons butter, and cook, stirring constantly, until it reaches the soft ball stage, 240 degrees F. Stir in the vanilla and remove from the heat. Let cool to 200 degrees F.

Using a tablespoon, spoon caramel on top of each nut cluster and let harden. (If the caramel becomes too stiff to pour, return to low heat, and cook, stirring constantly, until it returns to the proper consistency.)

To make the chocolate coating, in the top of a double boiler or in a metal bowl set over barely simmering water, combine 6 ounces of the chocolate and the shortening. Melt over low heat, stirring, until it reaches 116 to 118 degrees F, or feels fairly warm but not hot to the touch.

Remove from the heat and stir in the remaining 2 ounces of chocolate. Continue stirring until the chocolate reaches 80 degrees F or feels cool to the touch. Return to low heat and cook, stirring, until the temperature rises to 85 to 87 degrees F, or feels barely cool. Remove from the heat.

Drizzle 1 tablespoon of tempered chocolate over each cluster. Set aside in a cool place to harden. Store in an airtight container at room temperature for up to 2 weeks, with waxed paper separating the layers to prevent sticking.

Tuesday, February 17, 2009

Buttermilk Pancakes


If your like me you have a vast collection of cookbooks but keep just a few close at hand. I adore my Italian Regional Cookbook's, my La Cucina, Gourmet and Bon Appetit magazines, my Recipes from a French Herb Garden and my Afternoon Tea book, but none has afforded me the lessons learned and substitution and equivalencies taught as much as my Better Homes and Garden and The Joy of Cooking Cookbooks that I received as a young bride 21 years ago. With pages yellowed, flour imbedded and a stale smell from moisture, I would still die without these faithful companions. I think they are the backbone to basics, the heart of creativity and the foundation to solid cooking techniques and individual food exploration.

My husband has always enjoyed mornings of homemade pancakes, so the rewards of hearing "wow's", "thank you" and "pass me more please" has kept me from buying boxed brands that are quick and easy to prepare. Although.. homemade pancakes are totally easy to mix quickly and enjoy within a half hour. So it totally surprised me when a new pancake from my kitchen was born, the Buttermilk version. I never buy buttermilk so I had never made them until this past weekend. A few cake recipes I have recently made called for buttermilk so it was still on my refrigerator shelf. When I went to grab the milk for pancakes only a few tablespoons drizzled out of the carton, hmm, I promised my Valentine pancakes so I grabbed the buttermilk and my BHG cookbook for a recipe. We were all shocked at how much better the buttermilk version was. They are lighter, softer and less pasty. Really! I can't believe I went all these years not having a buttermilk pancake! :) This is the recipe from the BHG cookbook. I doubled it and wrote the new equivalencies here.

Have you a pancake preference?

Ciao and Buon Appetito!
Laurie


*Doubled from the new BHG Cookbook

INGREDIENTS
2 cups unbleached all-purpose flour
2 Tablespoons Sugar
2 Teaspoons Baking Powder
� Teaspoons Baking soda
1/2 Teaspoon Salt
2 Beaten Eggs
2 � cups Buttermilk
4 Tablespoons Cooking Oil

DIRECETIONS
1. In a large bowl stir together flour, sugar, baking powder, baking soda, and salt. In another bowl use a fork to combine egg, buttermilk, and oil. Add egg mixture all at once to flour mixture. Stir just until moistened (batter should be slightly lumpy).

2. For standard-size pancakes, pour about 1/4 cup batter onto a hot, lightly greased griddle or heavy skillet, spreading batter if necessary. For dollar-size pancakes, use about 1 tablespoon batter. Cook over medium heat for 1 to 2 minutes on each side or until pancakes are golden brown, turning to second sides when pancakes have bubbly surfaces and edges are slightly dry. Serve warm. If desired, top with syrup. Makes 12 standard-size pancakes or 40 dollar-size pancakes.

Friday, February 13, 2009

Warm Milk with Butter, Rum & Nutmeg

While the weather outside is frightful.. inside it's so delightful!

There's nothing like a hot beverage to keep my hands warm and my tummy tickled. Warm milk has always been a favorite, from the time I was a young girl needing a night cap to help me sleep, and even now enjoying a cup with my own children whether it be morning, noon or night.. it still takes the chill out of my bones and makes a great drink over good conversation.

For two servings heat on medium low 16 oz. of milk. Keep an eye on it so it doesn't scald. I like to use a whisk stirring consistently to create a froth. Add two - three teaspoons of butter, two - three tablespoons of rum, 1 1/2 tablespoons of brown sugar (to taste) and a dash of cinnamon. While milk is heating take a room temperature egg yolk, beat it and add 1/4 of a cup of the warm milk in a thin stream. Beat well. Add this back into your heating milk. Cook for 2 - 3 more minutes continuing to briskly whisk. The egg yolk makes for a rich creamy Butter Run Milk. When I am making this for my children I substitute the rum with maple extract or vanilla bean. If you are using extract 1 teaspoon should suffice. When it is heated to your desired temperature ladle into mugs. Sprinkle nutmeg on top and enjoy!

Even though the weather has been cold and wet, I have still had a beautiful display of flowers in the yard. We trimmed back the roses a few weeks ago, and we are already starting to get new buds. I can't wait to see them bloom!

This is growing under the fence from my neighbors yard. Isn't it beautiful! I think it's a blue clematis but I am not quite sure. My clematis hasn't flowered yet and doesn't usually show flora till march and april.

Do any of you know what flower this is?

Tuesday, February 10, 2009

Country Bob's


There are very few sauces that I can honestly say, "You can eat from a spoon".

First let me start off by saying, I don't consider myself a critic. When I publish a review on my site I am in actuality promoting the product. If I am not happy with a sampling of an item I have reviewed, I will decline to write about it on "my blog". But that doesn't mean I won't give my opinion when asked here at Dalla Mia Cucina! :) When I write a review with enthusiasm.. it's not that I am being paid to give it high rankings.. it's because I truly liked the product and would purchase it as needed on my own.

So on to Country Bob's... "I loved this sauce", and you can quote me on that!
In general meat sauces are easy to make. Whether you use catsup or tomato paste, molasses, brown sugar or honey, smoke flavoring, apple cider vinegar, pepper, hot sauce, or worcestershire.. there are a myriad of ways to prepare it, but if the quantities are off, it can be too sweet, bitter or fire extinguisher needed hot!

Barbeque sauces are a favorite of my children's as well as my husbands. My husband and I like it a little on the spicy side, but for the sake of the little ones, we usually keep it mild. When I opened the bottle I wasn't sure what I would get but surprisingly it had a fresh taste, no side affect of bitterness from too much spice, the sweetness was not overpowering and the tomato was there but not distinguishably pasty. It all melded wonderfully and the smell.. the distinct flavor of what we love about grilling!

Country Bob's offers a variety of sauces as well as seasonings. I was a proud recipient of two bottles of "Uncle Bob's Original All Purpose Sauce" which also comes in a "Spicy" variety. They also make "Barbecue Sauce", "Seasoning Salts" and just released their very own "Country Bob's Cookbook".

I made a simple chicken recipe with Uncle Bob's Original All Purpose Sauce. I was concerned that the little ones might find it too spicy for them, so I added a can of crushed pineapple to 1 and a 1/2 bottles of the sauce. I browned my chicken on all sides, and then put them in a baking dish and covered them completely with the Pineapple All Purpose Sauce blend. I then baked them in the oven at 350� for around 45 minutes. Checking periodically with a meat thermometer till it read 160�.

I had twelve thumbs up on a fabulous meal thanks to Country Bob's All Purpose Sauce and the commitment to excellence the staff holds too in honor of their
CEO. Congratulations to a wonderful family, I look forward to many more meals and purchases from Country Bob's products!

Laurie m. Vengoechea

Wednesday, February 4, 2009

"True Delights" Pineapple Rum Cake with a Pineapple Banana Macadamia Nut Crust filled with a Tropical Rum Zabaione

Delightful, delectable.. these are just a few of the words that describe yet again a new and delicious nutty granola bar made by Quaker called True Delights. This month, Foodbuzz' Taste Makers have been given the privelidge of trying a newly introduced and just released on grocers shelves oat, nut and fruit bar that truly is satisfying.

In my package were two of each flavor; "Dark Chocolate Raspberry Almond", "Honey Roasted Cashew with Mixed Berries" & "Toasted Coconut Banana Macadamia Nut". Are you all saying "Wow"? These bars are filled with yummy goodness and hearty ingredients. The cashews, almonds and macadamia nuts were truly a delight in there whole state instead of everything being ground and undetectable. The chocolate was premium and the fruit was chewy with a pleasant flavor of honey and oats throughout.


The excitement of this particular product review is in the invitation to create a recipe utilizing the Truly Delightful bar of our choice. I wanted the ingredients to be tasted true to there original form as possible but still at the same time, utilize what makes Dalla Mia Cucina cooking and baking unique to my Italian heritage. I incorporated some of my favorite dulce ingredients
like a Zabaione, infusing it with a tropical flare by adding pineapple to the rum for a velvety smooth custard filling that all melded so wonderfully with a crust on the bottom of the cake made by crumbling the Coconut Banana Macadamia Nut Bars.
It all came together so nicely and topped with fresh whipped cream and coconut flakes it made for a truly delightful dessert!

I highly recommend you try True DelightsTM Granola Bars by Quaker�!

FYI Nutritional Information;
140 Calories
Zero Grams Trans Fat
Cholesterol Free
3 g Fiber
For only $3.49 a box (5 bars per box)


Pineapple Rum Zabaione Filling


4 egg yolks
2 tablespoons sugar
5 tablespoons pineapple juice &
3 tablespoons rum blended together and ready to go

1. Boil some water in a sauce pan.
2. Separate the yolks from the whites and place the yolks in a heat proof bowl. Discard the whites.
3. Add the sugar and whisk (or mix with an electric mixer) until the mixture turns light yellow.
Place the bowl with the egg mixture on top of the pan with
boiling water. Continue whisking. Do not allow the bowl to touch the water.
4. In a thin stream, SLOWLY add the pineapple rum liquid to the egg mixture as you keep whisking.
5. Keep beating the egg mixture until it has doubled in volume and is fluffy and light...about 10-15 minutes.
6. Take off heat. Place a piece of plastic over it and keep in the refrigerator till time to fill cake.


True Delights Crust
3 Quaker �True Delights�
Toasted Coconut Banana Macadamia Nut Bars crumbled
Break apart the True Delight bars and crumble onto the
bottom of your prepared pan. Set aside.


Pineapple Rum Cake
2 cups all-purpose flour
1 teaspoon baking soda
1 1/2 teaspoons baking powder
1/2 teaspoon salt
4 large eggs separated and left to come to room temperature
1 1/2 cups granulated white sugar
1/2 cup light olive oil
� cup pineapple juice
1 � Tbsp. Rum
1 16 oz. can (2 cups) crushed pineapple (liquid squeezed out and set aside)


Preparations
Preheat oven to 350�
Grease a cake, bunt or loaf pan. Cut a piece of parchment paper to fit on the bottom if you are using a pan that is not a bunt.

Break apart the True Delight bars and crumble onto the bottom of your prepared pan. Set aside.

In a bowl, sift flour together with baking soda, baking powder and salt. Set aside.

In a blender with whip blade, add egg yolks with sugar. Whip till eggs become light in color and sugar has dissolved. Add oil, pineapple juice and rum till well combined. Scrape this mix into a separate large bowl. Clean mixing bowl and dry, making sure the bowl is not greasy at all. Add egg whites and whip till soft peaks form. When egg whites are ready, carefully fold them with a spatula into the egg yolk sugar mixture. Using half of the quantity at a time.

Take your flour mixture that you previously set aside and carefully sprinkle and fold this into your wet ingredients. Add in ratios of a cup at a time. Remember to fold not stir! When ingredients are just incorporated fold in the crushed and squeezed pineapple.


Pour into prepared baking dish or pans on top of the crumbled True Delights bars. Bake 35-40 minutes or until a toothpick inserted in the center comes out clean. Depending on your pan size and whether or not it�s coated, the cooking time may greatly vary. Start checking your cake at 35 minutes.

After 10 minutes of resting, release cake and let cool on platter. Make sure cake is cool before decorating it with whipped topping.

When cake is cool, slice to make two halves. Fill the middle with zabaione. Replace top.

Coconut Whipped Cream Frosting


2 Cups heavy whipping cream
3 Tablespoons sugar
2 cups Coconut flakes

Whip cream with sugar till stiff peaks form. After spreading it over the cooled cake, press coconut flakes onto the cake.


Enjoy this Dalla Mia Cucina specialty cake. I think you�ll love the pineapple rum zabaione filling when eaten in conjunction with the whipped coconut cream topping and the wonderful crunch of the True Delight�s Coconut, Banana, and Macadamia nut bar crust. We all enjoyed it immensely!
Ciao and Buon Appetito,
Laurie


Can you see the nutty granola crust. It had such a nice affect and it was still chewy like it's original form.

Tuesday, February 3, 2009

Meatloaf Dalla Mia Cucina

For me, meatloaf is one of those homey dishes that falls under the category of comfort food. Like that of a a rotisserie style or baked chicken, the preparations are simple and there's nothing easier than having the oven do it's magic! Growing up as a young girl I remember sharing many a meal at friends houses. It always amazed me even back then at the variety of ingredients and the recipe alterations that each different family added to make their meatloaf unique with their own personal style or handed down family recipes. Lori Lynn from Taste With The Eyes did a post called Let's Share Our Meatloaf Secrets last year. I loved her variety and her readers also had diverse combinations that made their loaf their very own. I know it's a bit late, but I am now getting around to posting my most treasured secret recipe for meatloaf. :)

The ingredients are quite simple and prepared a bit like a large loaf shaped meatball. You can use two meats here, but it's not necessary, for some reason the grocers in my area don't carry ground veal except for around the holidays. Although you can have veal cutlets ground by the meat department attendants.

Ingredients
2 lbs Ground Meat of your choice (I prefer 1 1/2 lbs. sirloin and 1/2 lb. veal combined)
2 cloves minced garlic
1 tsp. finely chopped shallots
2 Peperoncini rinsed and finely chopped
*1 medium celery rib, finely minced
*1 medium carrot, finely minced
1/4 cup fresh basil julienned
3 tbs. fresh Italian flat leaf parsley
fresh ground black pepper to taste
1 tsp. kosher salt
2 eggs
1 cup + 1/4 cup fresh grated Parmigiano Reggiano
3/4 cups dry Italian style bread crumbs (or Panko if you use that)
1 cup + 1/8 cup red wine
8 slices Provolone cheese
Tomato Paste with no seasonings (reserve 3 tablespoons for top of loaf
*I didn't add it in this particular meatloaf, but a soffrito of carrots and celery are always a must!

Preparations
Start by setting aside 1/4 cup Parmigiano, 1/8 cup red wine, 3 tablespoons tomato paste and 2 slices provolone cheese.
Make thin slices of the provolone for the top of the meat loaf, the remaining six slices will go in the middle as a cheesy layer for the meatloaf.

Mix meats, garlic, shallots, peperoncicni, minced celery and carrot, basil, parsley, salt and pepper together. Add eggs, red wine and tomato paste, blend well. Continue by adding parmesan cheese and bread crumbs. If the mixture is too dry add more wine. If it is too wet add equal amounts of parmesan and bread crumbs.

In a loaf pan put half of the meat mixture. Lay the slices of Provolone layering them to overlap each other. Put the remainder of meat on top of the cheese and smooth out. Spread the set aside tomato paste on top of the loaf. Criss-cross the slices of Provolone on the paste. Sprinkle with the parmesan cheese and drizzle red wine on top.

Bake on middle rack in a 350� oven for 55 - 60 minutes. Meat read thermometer should read 160� for. Let rest for ten minutes. Buon Appetito!

One half of meatloaf in pan ready to be topped with provolone.

Meatloaf with criss-cross of provolone slices, tomato paste, parmesan and a drizzle of red wine.

Look at all that yummy cheese oozing from the middle of the meatloaf. And the criss-cross design looks so pretty.. as far as meatloaf goes! :) Don't you think meat is hard to photograph?
Ciao and Buon Appetito!
Laurie